I stumbled on this by accident, looking up some articles on digital lighting and rendering:
- Everything you ever used to do was WRONG
- Everything you ever got out of your renderer before was WRONG
- Everything you’ve ever put into it was WRONG
(From: http://mymentalray.com/wiki/index.php/Linear_color_space)
Pretty blunt, eh? It got me interested in finding out more about gamma correction and linear colour space, but unfortunately the majority of articles assume a fairly advanced level of understanding 3d graphics software and rendering programs. So what follows is a simplified, condensed summary of the topic, as I understand it. My aim is to try and present this in a form that’s clear and practical enough for intermediate/hobbyist artists, like myself, to understand and use. It’s taken me a while to get my head around this, so bear with me.
The basic idea is this:
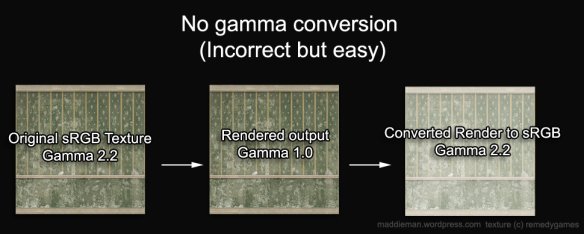
- 3d rendering software renders at a different gamma setting (1: linear colour space) to what your monitor is set at (2.2 on pc, 1.8 on mac). This is correct — it’s supposed to do this to get the light calculations right. But what it means is that you have to manually apply gamma correction to your rendered image afterwards (either in Photoshop, or by the rendering software itself).
- Unfortunately, a lot of people aren’t aware that their output render needs to be gamma corrected (and traditionally, the default settings don’t enable it), so instead, when they render their work, they compensate by adding more lights, and other shader “tricks”. While this is OK for most people; technically speaking, the renders are physically inaccurate (i.e. WRONG), and you’re not making the most of the renderer. You’ll will also see more visible problems when you use more advanced lighting, such as fall off.
- Furthermore, the majority of the textures you put into your renderer have already been gamma corrected beforehand (in photoshop). So what happens when you apply gamma correction to your image at the end is that it gets applied twice (before rendering, and then afterwards) — making the image look washed out. Since you only want gamma correction to be applied at the end of your rendering pipeline, it’s necessary to gamma un-correct all of your texture maps, materials, and shaders before the renderer works with them.
So in a nutshell, what you need your software to do is:
1. Input Gamma: Automatically apply gamma un-correction to your texture maps, shaders and materials beforehand, by an inverse gamma of 2.2. (i.e. 1/2.2 = 0.4545454…)
2. Output Gamma: Automatically apply gamma correction to your rendered output, thus bringing your image to the correct colour space as your monitor (2.2. or 1.8.).
The settings will vary from program to program, but at the very least you should expect to see input and output gamma settings.
If your rendering software doesn’t have any options for Gamma correction (e.g. Daz Studio 2.x), then you can still work in linear colour space, but it’s a heck of a lot harder to set up and more difficult to tell if you’re doing it correctly.
1. Input Gamma: You have to un-gamma correct everything by hand (i.e. in Photoshop). And I mean everything — textures, shaders, colours — the works. You can use an inverse gamma curve to do this, or by adjusting the input levels midpoint by 0.455 (image-> adjustments->levels…).
2. Output Gamma: Simply apply 2.2 gamma correction inside Photoshop (or equivalent), and hope for the best.
The problem with this method is in how accurate your gamma correction is. I’m still using regular Photoshop CS, and there are no explicit gamma controls. Even worse, changing the gamma via levels gives me a slightly different results to using curves, making reliability an issue.
If that was a load – don’t worry. :) It’s taken me the better part of a year to get my head around it, and in spite of that, I’m still not crystal clear on some parts.
However, I will end this by saying that understanding linear colour space and gamma is worth the effort. It might not instantly transform your images into works of art, but the lighting will at least look natural — even if your characters don’t.
____
Update:
I’ve discovered a more consistent and reliable way of correcting the gamma in Photoshop, using colour profiles. Essentially what you do is make a linear colour space profile with a gamma of 1.0, and then you assign this profile to your textures before working on them. When you finish, you convert your render to sRGB or AdobeRGB and it does the gamma correction automatically. As this was requested in the comments, I’ll walk you through an example:
Creating a linear space colour profile
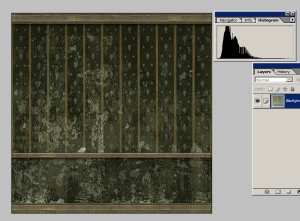
So, you have your basic jpg texture map in sRGB like so:
This one is from Max Payne, by Remedy.
The first thing you want to do is turn Proof Colours on, and edit Proof Setup to Monitor RGB (or win/mac rbg if you prefer). You shouldn’t see any visual difference, and that’s intentional. However, it’s worth getting into the habit of checking proof colours because when you start working with linear colour space in Photoshop, you’re going to need to turn proof colours on and off to see what it looks like. I also recommend at this point that you convert the image from 8bit per channel to 16 bit (so we don’t lose any colour information during the conversion), in the Image->Mode settings.
So essentially, all we want to do is create a colour profile with a gamma of 1. We do this by choosing Image -> Mode -> Convert to Profile…
Under the heading “Destination Space, Profile:” choose Custom RBG… ; this will bring up another window that lets you set your colour profile. Simply change Gamma to 1.0, and rename it to something like “Linear Colour Space”. Leave the other settings to default. Under Engine, I left it as ACE, and under ‘Intent’ I changed it to Relative Colorimetric. Hit ok, and…
Nothing happens.
Set your proof colours to Monitor again and… now your texture map looks darker. That’s the image correctly converted to linear colour space (gamma un-corrected). If you’ve been paying attention to the histogram, you should also notice that it has shifted to the left.
Now, if you save the image as a png or tif, your renderer of choice should correctly import the texture in linear space.
The final step is to create a custom colour profile so you can quickly convert other texture maps to linear.
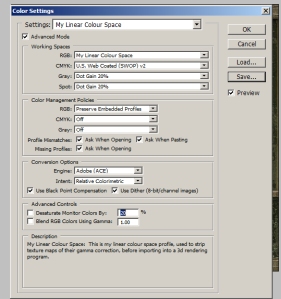
You can do this under Edit -> Colour Settings…
Under Working RGB, if there isn’t already a linear RGB profile, simply choose ‘custom RBG’ again, and set gamma to 1.0. Then save your profile and give it a good description.
Working in linear
With your linear colour profile created, you need to start thinking terms of linear (gamma 1.0) and sRGB (gamma 2.2) space. Assuming your rendering software doesn’t support colour correction (modern ones like Blender finally do at last, making this entire article moot), your renderer will be working in linear colour space (gamma 1). That means that all inputs (colours and textures) should be converted to linear colour space beforehand in Photoshop, and all outputs from your renderer will also be in linear colour space (again, unless you change the gamma settings). In layman terms, it means everything will look darker and more saturated than you’re used to — this normal. The final step is to apply gamma correction to your rendered image in Photoshop, to correct it back to sRGB / gamma 2.2.
Why go to all this effort? Two simple reasons. The first is that it’s the correct workflow: – Imagine if you were a master painter and you bought a new set of paints to paint skin ‘realistically’. Now imagine that, as the paint starts to dry, you realise that the colours look a little different to how they are on the tin, and so you starting mixing in new colours to compensate. As explained in the first part of this article, your renderer works in gamma 1.0, and does all lighting and colour calculations in a linear colour space. Therefore you will get the best (correct) output by converting your input textures and colours to linear colour space, before loading them into your rendering program. Working without linear input will result in ‘wrong’ output, and encourages people to incorrectly adjust the lighting and colours to compensate. The end result will look OK, but is now several steps away from being physically accurate.
The second, and more practical reason is that it gives you much more control and flexibility in the post production phase of cg. Working in linear gives you a richer output to work with, and allows for more subtle tone-mapping and post work — particularly if you export your image using a high dynamic range format like HDR or OpenEXR.
Ultimately though, this is a very hardcore approach for only the most OCD artists who want to produce production quality renders. You can still get excellent results without ‘going linear’, but it’s always worth understanding the process and the benefits, so you can choose which pipeline to use.
Ideally your software should have options for colour correction and gamma built in, and most do now. However, when I originally started this article, Daz Studio had no gamma options. In version 4, they’ve added gamma output correction, which means it can automatically convert the output render to 2.2, but that still requires you to fuss about converting your texture maps to linear. Blender, on the other hand, does of all of this automatically, which means you get all of the benefits without having to think about the pipeline. However, that program has it’s own quirks (like a UI from HELL), so there are always tradeoffs.
Further reading:
http://mymentalray.com/wiki/index.php/Gamma
http://mymentalray.com/wiki/index.php/Linear_color_space
http://forums.cgsociety.org/showthread.php?t=305727
http://forums.cgsociety.org/showthread.php?t=610790
http://www.poserpro.net/King_Tut/Gamma/PoserPro_Gamma.html
http://www.poserpro.net/King_Tut/vids/Gamma/Poser_Pro_Gamma.htm
http://www.renderosity.com/mod/forumpro/showthread.php?thread_id=2762503&page=1


Pingback: Gamma-correct rendering | Molecular Musings
anyway you could put up a tutorial about the color profiling method for gamma correction?
Sure thing Josh, I’ve updated it to explain how create a linear colour profile. Once you’ve created it, you can load renders into your linear colour space profile, and then convert profile to sRGB, and it will automatically gamma correct for you.
thanks alot for the effort :) much appreciated!
You can’t save textures in linear space.
sRGB and gamma correction preserves information for dark colors(gradient start).